As A Fleet Manager, Preventative Fleet Maintenance Is One of The Best Investments You Can Make

Mainline Truck Team • January 9, 2022

If you're managing any kind of working fleet, the best way of dealing with problems is to not let those problems happen in the first place. Your fleet is a vital part of the business, and anything that stops your vehicles from working will ultimately put a strain on the entire operation. So preventative fleet maintenance really is the best way to go - and it becomes easier than ever with service contracts. For a nominal fee, experts can ensure your fleet is always in top condition, bringing numerous benefits to your operation.


Not convinced the cost is justified? Here are just a few ways a fleet maintenance contract really pays off.


4 Reasons That Contracted Fleet Maintenance Makes Sense


1 - Prevent unnecessary downtime


If your vehicles are being regularly serviced and maintained by genuine experts, the chances of anything going wrong on the road is radically decreased. This means less lost productivity, higher profits, and - for those in shipping or passenger transportation - happier customers. Reliability matters in this industry and can be key to holding on to crucial customers or contracts.


2 - Protect your drivers


We don't need to tell you that finding enough qualified drivers is difficult these days. The last thing you want is to put them in additional danger or - worse - give them reasons to look for employment elsewhere. A strong maintenance program keeps your drivers safe on the road, while also sending a clear message that their safety matters to you. That can be vital for maintaining morale and preventing anyone from poaching your drivers. It could even be a selling point for recruitment!


3 - Reducing ongoing costs


In the grand scheme, a maintenance contract will often save you money in the long run. Basic maintenance is always cheaper than major repairs or part replacements since it can significantly extend the life of components. It can even extend the lifespan of the vehicles as a whole. This ultimately means lowered TCO for all your vehicles.


4 - It's one less thing to worry about


When you have pros taking care of your vehicle maintenance, that's a load off your own shoulders. You'll have more time to focus on management and improving productivity, rather than having to devote your own time to managing repairs. 

Mainline RV & Truck Service offers affordable and effective fleet maintenance contracts that are right for any fleet's budget. Contact us to learn more.

Contact Us

Trailer Wheel Bearing Service: Repack or Replace? Guide
By WSI ALM • November 14, 2026
Learn when trailer wheel bearings need inspection, repacking, adjustment, or replacement, plus related safety checks before towing. Schedule service today.
RV Air Conditioner Repair: Problems, Solutions, & Fixes
By WSI ALM • November 13, 2026
Learn the causes of RV AC problems, plus safe owner checks and when professional repair is needed. Schedule service with Mainline RV & Truck Service today.
RV Slide-Out Motor Repair: Causes & Repair Options
By WSI ALM • November 12, 2026
Is your RV slide-out motor not working? Learn common causes, warning signs, and when professional RV slide-out repair is needed. Schedule repair today.
Tongue Weight Mathematics: Key to Preventing Trailer Sway
By WSI ALM • November 11, 2026
Learn how tongue weight affects sway control for travel trailers, then contact our team at Mainline RV & Truck Service for expert guidance today.
Bent Axles And Curb Strikes: Utility Trailer Dog-Tracking Solutions
By WSI ALM • November 9, 2026
Discover how curb strikes cause bent axles and trailer dog-tracking. Learn how to spot tire wear and when to schedule expert utility trailer repair.
July 20, 2026
Running a fleet is a constant tightrope walk. You need to keep operating costs down, but you can’t afford to let trucks sit idle. The second a rig rolls into the shop, you are faced with a choice that directly impacts both your schedule and your bottom line. Do you use Original Equipment Manufacturer (OEM) parts, or do you opt for aftermarket equivalents? There is no one-size-fits-all answer here. The right move depends entirely on the vehicle's age, what exactly broke down, and how fast you need that truck back on the highway. At Mainline RV & Truck Service in Cleveland, Ohio, we help fleet managers navigate this decision every day. This guide breaks down the core differences between OEM and aftermarket components so you can make highly informed, profitable decisions for your truck fleet maintenance program. When OEM Parts Are Non-Negotiable OEM parts are built by the company that manufactured your truck. If you drive a Freightliner, Kenworth, or Peterbilt, an OEM part is the exact component installed on the assembly line. Because they are exact replicas, they offer guaranteed fitment and predictable performance. There are specific situations where our commercial truck shop strongly recommends sticking strictly to OEM parts: Active Manufacturer Warranties: If your truck is still covered by the manufacturer's factory warranty, using aftermarket parts on covered systems can possibly void that protection. To keep your warranty intact, using OEM parts for those specific repairs is recommended. Complex Electronic Systems: Modern trucks rely heavily on advanced sensors, engine control units (ECUs), and emissions systems. These electronic components communicate using proprietary software. Aftermarket sensors sometimes fail to communicate correctly with the vehicle's computer, leading to phantom warning lights and repeat visits to the shop. Critical Structural and Safety Components: For major internal engine components, turbochargers, and complex transmission parts, the precise metallurgy and engineering of OEM parts provide peace of mind. While OEM parts deliver maximum consistency, they also come with a premium price tag. For older trucks or non-critical systems, paying that premium does not always make financial sense. High-Quality Aftermarket Equivalents: Smarter Cost Savings The term "aftermarket" covers a massive spectrum of quality. It ranges from cheap, unbranded components to heavy-duty parts that actually exceed original factory specifications. Reputable aftermarket manufacturers often reverse-engineer OEM parts to find and fix common points of failure. This means a high-quality aftermarket part can sometimes outperform the original component. Using high-quality aftermarket alternatives offers several distinct advantages for your truck fleet maintenance budget: Substantial Cost Reductions: Aftermarket components are generally 20% to 50% less expensive than their OEM counterparts. For a fleet with multiple vehicles, these savings add up to thousands of dollars annually. Perfect for Non-Critical Components: Systems like lighting, mud flaps, exhaust hangers, brake drums, and cabin filters are perfect candidates for aftermarket parts. You get the same level of performance without paying the brand-name markup. Extending the Life of Older Trucks: If a truck is nearing the end of its service life in your fleet, investing in expensive OEM parts rarely provides a good return on investment. High-quality aftermarket parts keep older assets working safely without blowing your budget. When you work with a trusted truck repair facility, our technicians will guide you toward heavy-duty aftermarket brands that do not compromise on safety or longevity. Availability vs. Lead Time: The Real Cost of Downtime If a truck is sitting in a bay, it’s actively burning money. Industry data pegs the real cost of commercial truck downtime anywhere from $450 to over $1,000 a day per vehicle. At those rates, a 'cheaper' part isn't actually cheap if you have to wait two weeks for it to arrive. Availability is a major factor in the OEM vs. aftermarket debate: OEM Supply Chain Bottlenecks: OEM parts must flow through specific dealer networks. If a factory is experiencing production delays or a regional warehouse is out of stock, you might face long lead times. The Aftermarket Accessibility Advantage: Hundreds of companies manufacture aftermarket parts. This vast network means that if one distributor is out of stock, another likely has the part ready to ship. Getting Trucks Back on the Road Fast: When a truck needs immediate repair to meet a delivery deadline, choosing a highly reliable, readily available aftermarket part is almost always the smarter business decision. Speed of repair is often the most critical metric for fleet survival. How Mainline-Sourced Parts Protect Your Fleet’s Efficiency We don't do cookie-cutter maintenance. As a local Cleveland shop, we’ve spent years building a reliable network of parts suppliers so we can get you the best balance of speed and cost-efficiency. Our sourcing strategy is built on three core pillars: Strategic OEM Partnerships: As an experienced service facility, we maintain strong relationships with leading heavy-duty truck manufacturers. This gives our team direct access to factory-approved parts, specialized software, and diagnostic data when only OEM will do. Vetted Aftermarket Distributors: We do not buy cheap, unbranded parts off random websites. We only source aftermarket components from established, heavy-duty manufacturers who back their products with robust warranties. If we would not put it on our own vehicles, we will not install it on yours. Optimized Local Inventory: We keep a smart mix of high-demand maintenance items in stock at our facility. This allows us to complete routine services, like brake jobs, belt replacements, and fluid changes, with zero shipping delays. We analyze every repair individually. If we can save you money safely with an aftermarket equivalent, we will present that option alongside the OEM quote. You retain final control over your fleet's parts strategy. Contact Us for Truck Fleet Maintenance Today Keeping your trucks moving requires a repair partner who understands the balance between parts cost, component longevity, and minimizing downtime. Mainline RV & Truck Service has spent over 40 years helping fleet operators in Cleveland and Northeast Ohio keep their vehicles safe, compliant, and highly productive. Our 16,000-square-foot facility and certified technicians are fully equipped to handle everything from routine DOT inspections to complex engine diagnostics and rebuilds. Do not let parts delays or unexpected repair bills slow your business down. Contact our team today to discuss a customized preventive maintenance program for your commercial fleet.
July 20, 2026
Modern diesel RVs and motorhomes are heavy-duty powerhouses, built to carry heavy chassis, tow vehicles, and climb steep highway passes. But keeping that diesel engine running efficiently requires paying close attention to your exhaust aftertreatment system. At the center of this emission control system is the Diesel Particulate Filter (DPF). When your DPF is clean and clear, your RV just runs better. You'll get better fuel mileage and stay on the right side of emissions laws without even thinking about it. If the filter fails or becomes blocked, your motorhome can enter a sudden "limp mode," lose highway power, or suffer severe, expensive engine damage. Knowing how to spot the early warning signs of a clogged DPF can literally save you thousands in avoidable replacement costs. What is a DPF and How Does It Work? The Diesel Particulate Filter is a specialized exhaust component designed to capture and store soot, the black carbon particles created during diesel combustion. The filter is constructed from a ceramic honeycomb substrate, usually cordierite or silicon carbide, that traps these microscopic particles before they can escape into the air. You can’t just toss a dirty DPF in the trash like a standard air or fuel filter. These units are built to self-clean on the go using a high-heat cycle called regeneration. During regeneration, the exhaust system reaches temperatures high enough to incinerate the trapped soot, converting it into a much smaller volume of harmless, inert ash. When this self-cleaning cycle fails to occur, soot builds up, restricts exhaust flow, and creates severe backpressure on your engine. This backpressure forces the engine to work much harder, dragging down your fuel economy and straining internal components. Regular monitoring and professional cleaning are essential to prevent this failure loop. Passive vs. Active Regeneration: The Self-Cleaning Cycles Your RV relies on two primary types of automatic regeneration to keep the DPF clear of soot: Passive Regeneration This occurs naturally during highway driving. When the engine operates under a consistent load at highway speeds, exhaust temperatures naturally reach 650°F to 900°F. The DPF continuously burns off soot without requiring extra fuel injection or engine adjustments. This is the most efficient way for your DPF to clean itself, as it uses no additional fuel. Active Regeneration If your exhaust doesn't stay hot enough, usually due to short trips, city driving, or prolonged idling, the engine control unit (ECU) steps in. The ECU injects a small amount of diesel fuel into the exhaust stream, where it reacts with the diesel oxidation catalyst. This reaction artificially raises the DPF temperature to around 1,100°F to burn away the accumulated soot. You might notice a slight drop in fuel economy, a higher idle speed, or a distinct hot smell when this cycle is active. What Causes Premature Ash Accumulation? While regeneration destroys soot, it leaves behind a tiny amount of non-combustible ash. Soot burns away, but ash does not. Over time, this ash builds up inside the micro-channels of your filter, permanently reducing its capacity until it is physically removed. So, what causes this ash to build up faster than it should? A few common culprits usually lead to early clogging: Using the Wrong Engine Oil: Diesel engines with DPFs require low-ash oil (specifically API CJ-4 or CK-4). Standard oils introduce high levels of zinc, phosphorus, and sulfur, which quickly plug the filter with unburnable metallic compounds. Engine Coolant or Oil Leaks: Leaking head gaskets, worn valve seals, or turbocharger seal failures allow coolant or oil to enter the combustion chamber. These fluids coat the DPF substrate, forming a sticky, glassy glaze that permanently ruins the filter. Poor Quality Fuel or Additives: Low-quality diesel or unapproved fuel additives leave behind heavy chemical deposits that degrade the ceramic filter walls. Excessive Idling: Prolonged idling prevents the exhaust from reaching functional regeneration temperatures. This leads to rapid soot accumulation and "wet-nesting," where unburned fuel and soot paste together inside the filter. The "Forced Regen" Dilemma: When to Call a Pro When your dashboard lights up with a DPF warning icon, the soot load has reached a level that normal driving cannot clear. Your RV's computer may prompt you to perform a stationary "parked" or "forced" regeneration using an onboard command or a diagnostic tool. It might buy you enough time to get to the next exit, but forcing a regen isn't a permanent fix, and it isn't risk-free. Warning: Forced regenerations subject your engine, turbocharger, and exhaust system to extreme thermal stress while the vehicle is stationary. Frequently forcing a regeneration to bypass a deeper mechanical problem can lead to warped exhaust manifolds, damaged turbo seals, or cracked DPF ceramic substrates. If your RV repeatedly demands a forced regeneration, or if the DPF light remains on after a cycle, the filter is likely packed with ash, or there is an underlying sensor failure. Continuing to drive in this state will force the engine into limp mode, limiting your speed. When this occurs, you must take your vehicle to an authorized service center. Contact Us for RV Repair, Commercial Fleet Maintenance, and More Today Keeping your DPF and aftertreatment system clear is one of the smartest things you can do to protect your diesel RV or commercial truck's engine. At Mainline RV & Truck Service, we have spent over 40 years helping fleet managers and motorhome owners keep their vehicles running safely. Our certified technicians operate out of our fully equipped 16,000-square-foot facility in Cleveland, Ohio. We utilize advanced electronic diagnostics to pinpoint emission system faults and provide comprehensive maintenance solutions designed to minimize your downtime. Whether you need a routine engine check, diagnostic troubleshooting, or structured truck fleet maintenance, our team is here to help. Contact Mainline RV & Truck Service today to schedule your next service appointment.
July 20, 2026
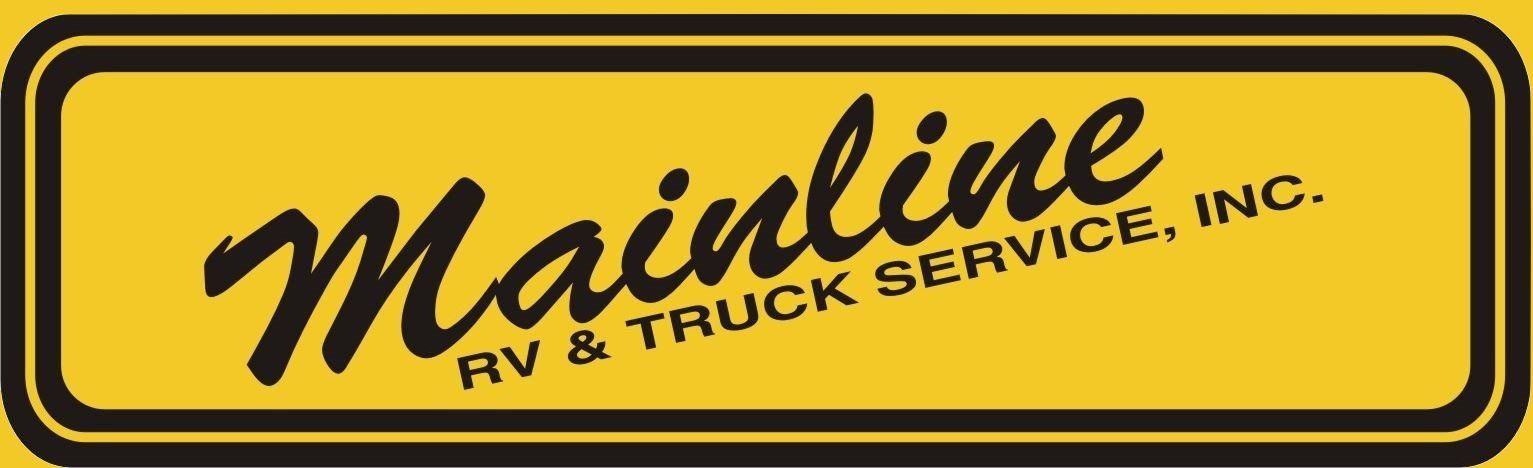
There is nothing worse than pulling into a sunny campsite, cranking up the AC, and getting blasted with warm air. When you're parked in direct sunlight, a motorhome can turn into an oven in minutes. Understanding how your cooling system operates helps you spot minor issues before they turn into expensive repairs. While complex electrical or refrigerant problems require a professional motorhome repair service, you can easily troubleshoot several common issues on your own. Running Your AC on Generator Power: Electrical Load Management Many owners encounter air conditioning issues when trying to run their units away from shore power. Your air conditioner consumes more electricity than almost any other appliance in your vehicle. Managing this electrical load incorrectly can cause your unit to shut down or damage its electrical components. An air conditioner requires starting wattage (the brief surge to start the compressor) and running wattage (the steady power to keep it going). If you are boondocking, your generator must handle both. To keep from tripping breakers, keep an eye on these specific power draws: Total Wattage Capacity: A standard 13,500 BTU RV air conditioner requires about 2,800 to 3,000 watts to start and 1,500 to 2,000 watts to run. Competing Appliances: You cannot run everything at once. A microwave uses 1,000 to 1,500 watts, while an electric water heater draws around 1,400 watts. The Power Converter: Your onboard converter constantly draws 300 to 800 watts to charge your house batteries. When your generator stalls, surges, or chokes the second the AC kicks on, the issue is likely under the generator's hood. Staying on top of regular maintenance is what keeps your power source responsive. If you notice erratic power delivery, you may need a professional Onan generator repair to clean the carburetor, adjust the governor, or replace worn parts. Why Your RV AC Freezes Up: Airflow vs. Low Refrigerant If you notice the airflow dropping or the cabin getting warmer by the hour, take a look at the unit; it might actually be frozen. Once ice builds up on those cooling coils, it chokes off the airflow entirely. While owners often assume low refrigerant is the culprit, a lack of adequate airflow is the most common cause of ice. The Role of Airflow Your air conditioner pulls warm, humid air from your cabin across cold evaporator coils. If air moves too slowly, the moisture condensing on the coils drops below 32 degrees Fahrenheit and turns to ice. Common airflow issues include: Low Fan Speed: Running your fan on "Low" during highly humid days can freeze the coils. Closed Registers: Closing too many ceiling vents restricts the volume of air moving through the system. A Misaligned Air Divider: If the thin foam divider separating the warm return air from the cold supply air slips out of place, cold air leaks directly back into the return side. Low Refrigerant Levels If your filters are clean, your vents are open, and your fan is running on high, you may have low refrigerant. Modern RV air conditioners are sealed systems that do not consume refrigerant over time. A low level means a physical leak exists. Unlike a home system, you cannot simply add more Freon because RV units lack service ports. Fixing a leak requires a certified RV repair shop to cut into the lines, install service valves, patch the leak, and recharge the system. The Fan Hums but Won't Spin: Checking the Capacitor If you turn on your thermostat and hear a humming sound from the roof but no air blows through the vents, you are likely dealing with a failed capacitor. Think of capacitors as tiny batteries that store up electricity and dump it in a quick burst to kick-start those heavy motors. Between blistering summer heat and sudden power surges, these parts take a beating over time. When a capacitor fails, the fan motor sits in place and emits a low electrical hum. You can perform a quick visual inspection: Disconnect Power: Turn off the air conditioner at the thermostat, shut off the main breaker inside the RV, and unplug the shore power cord. Remove the Shroud: Go onto the roof of your vehicle and remove the plastic outer cover of the AC. Locate the Electrical Box: Open the metal access panel protecting the wiring. Inspect for Damage: A healthy capacitor is a perfect cylinder. If the top is bulging, domed, or leaking oily fluid, the component has failed and must be replaced. Capacitors can hold a dangerous electrical charge even after you disconnect the power. If you are uncomfortable handling high-voltage components, it is safest to bring your vehicle to a professional RV repair shop. Maximizing Efficiency: Cleaning the Filter and Evaporator Coils Regular preventative maintenance is the simplest way to extend the lifespan of your cooling system. Dust, pet dander, and outdoor debris create a thermal barrier that reduces cooling efficiency. Cleaning the Return Air Filter Your return air filter sits just behind the ceiling grill inside your living space. Inspect this filter every two weeks during periods of heavy use. Remove the plastic grill cover. Take out the foam or mesh filter element. Wash the filter in a sink using warm water and mild dish soap. Allow the filter to dry completely before reinstalling it. Cleaning the Coils Your system contains two sets of metal fins that must remain clean: the evaporator coils inside the vehicle and the condenser coils on the roof. Evaporator Coils: Access these from inside the cabin or by removing the internal shroud on the roof. Gently vacuum away loose dust and spray self-rinsing coil cleaner onto the aluminum fins. Condenser Coils: Located on the roof, these coils gather leaves, dirt, and insects. Spray them with a heavy-duty coil cleaner, let it sit for ten minutes, and rinse the fins gently with a low-pressure garden hose. Never use a high-pressure power washer, as it will bend the delicate aluminum fins. Contact Our RV Repair Shop Today Chasing down AC problems gets complicated fast, especially when you start messing with rooftop wiring, control boards, or sealed lines. Plus, letting a malfunctioning unit run can overheat the compressor, turning a cheap fix into a massive replacement bill. If your motorhome stays warm despite your troubleshooting efforts, the experienced technicians at Mainline RV & Truck Service are ready to assist you. We operate a 16,000-square-foot facility equipped with modern diagnostic tools to handle everything from standard maintenance to complex electrical overhauls. Don't let a failing air conditioner ruin your summer travel plans. Contact Mainline RV & Truck Service today to schedule your service appointment.

July 20, 2026
Ask any veteran road-tripper, and they’ll tell you the same thing: water is your rig’s absolute worst enemy. Whether you're driving a luxury Class A motorhome or towing a lightweight travel trailer, a microscopic tear in your roof's protective layer is all it takes for rainwater to quietly seep in and destroy your walls, ceiling, and subflooring. By the time you spot a water stain inside your living space, the structural damage is already done. Wood rot, ruined insulation, and toxic mold growth are highly expensive to fix. At Mainline RV & Truck Service , we perform expert RV repair and motorhome repair service. We see firsthand how fast a neglected roof destroys a great vehicle. Protecting your investment is straightforward. You must understand how your roof seals, know how to inspect it, and ensure it gets resealed before a leak begins. Why Annual Inspections Cost Less Than Major RV Repair Most RV manufacturers recommend inspecting your roof seals at least twice a year. If you park your rig under trees or travel through areas with extreme temperature shifts, you should check it even more often. Putting off these quick inspections to save a little time almost always backfires. The Cost of Prevention: A routine roof inspection and minor sealant touch-up is a basic maintenance expense. It takes a couple of hours and uses relatively inexpensive materials. The Cost of Neglect: If water penetrates your roof membrane, it rots the thin plywood decking underneath. Eventually, the entire roof must be peeled off, the wood replaced, and a new membrane laid down. This level of camper repair can easily cost thousands of dollars. Being proactive pays off. It keeps hard-earned cash in your pocket and ensures your rig stays out of the shop when you should be out enjoying camping season. Spotting "Alligatoring" and Cracks in Old Sealant Of course, catching a leak early means knowing exactly what to look for once you're up on the roof. When you climb up to inspect your roof, pay close attention to the joints. These are the areas where the roof membrane meets the front and rear caps, side transition moldings, vent pipes, skylights, and your ladder mounts. Watch out for these clear warning signs: Alligatoring: This is when the surface of your self-leveling lap sealant dries out, shrinks, and cracks in a pattern that resembles alligator skin. It means the oils in the sealant have dried out from solar exposure. Deep Cracking: Look for deep splits that go all the way down to the metal or plastic flange underneath. Peeling and Lifting: Gently press the edges of the sealant. If it lifts away from the roof membrane easily, water is already bypassing it. Pinholes: Small, bubble-like holes can form as sealant cures or ages, creating a direct path for moisture. If you notice any of these signs, the old sealant must be cleaned, prepped, and resealed. Lap Sealant vs. Tape: The Right Materials for EPDM and TPO Roofs You cannot grab a tube of cheap silicone from a local home improvement store and apply it to your RV roof. Silicone does not stick well to RV roof membranes and will peel off quickly under highway wind pressures. Most modern RVs use one of two rubber-like membranes: EPDM (Ethylene Propylene Diene Monomer): A synthetic rubber membrane. TPO (Thermoplastic Polyolefin): A blend of rubber and plastic polymers. Choosing the right sealants for these specific materials is vital to avoid chemically damaging your roof. Self-Leveling Lap Sealant This is the thick, liquid sealant used on flat, horizontal roof surfaces. When applied around vents, pipes, and skylights, it slowly spreads out and flattens to form a watertight barrier over screws and seams. For EPDM and TPO: Use high-quality, brand-name lap sealants specifically rated for RV rubber roofs (such as Dicor 501LSW). Never use silicone: Silicone leaves a residue that prevents any future RV sealant from bonding to the surface. Non-Sag Sealant On vertical surfaces, such as the side seams of your roof or around the top of your entry door, you must use non-sag sealant. This formula is thicker and stays exactly where you put it without running down the side of your RV. Micro-Sealant Tape Heavy-duty adhesive tape is excellent for long, straight seams, like the transition area where your roof membrane meets your front or rear fiberglass caps. The Pros: It creates an incredibly durable, long-lasting barrier that resists sunlight damage better than liquid sealants. The Cons: It is highly permanent. If you ever need to replace a vent or skylight in the future, removing micro-sealant tape is extremely difficult and can tear your roof membrane if done incorrectly. AC Gaskets: A Hidden Source of Ceiling Leaks Many RV owners carefully seal every vent and pipe but still end up with a wet ceiling. The culprit is almost always the air conditioner gasket. Your roof-mounted air conditioner does not use liquid lap sealant or tape to stay watertight. Instead, it sits over a square opening in your roof and seals against a thick, square foam gasket. This foam gasket prevents water from entering the cabin. Over time, several things can cause this seal to fail: Compressive Set: The heavy weight of the AC unit permanently squishes the foam over several years until it loses its springiness and fails to seal. Loose Mounting Bolts: RV air conditioners are held in place by four long bolts accessible from inside the RV (by removing the plastic ceiling assembly cover). Road vibrations can cause these bolts to back out over time. If the bolts loosen, the gasket relaxes, and rainwater will pour straight down your air ducts or drip from your ceiling shroud. Gasket Decay: Constant exposure to temperature extremes eventually causes the foam to rot and crumble. If your AC mounting bolts are loose, tightening them gently can sometimes stop a fresh leak. However, if the gasket is old, compressed, or dry-rotted, the entire AC unit must be lifted so a new foam gasket can be installed. Contact Mainline RV & Truck Service for RV Repairs Today Let's be honest: hauling yourself onto an RV roof isn't everyone's idea of a fun Saturday. It’s tough physical work that involves balancing on slick surfaces, scraping away stubborn old adhesive without gouging the delicate rubber membrane, and trying to apply the new sealant before the weather changes. If you are not comfortable working on your roof, or if your inspection reveals damage that is already too advanced for a quick DIY touch-up, let our professional team handle it. Mainline RV & Truck Service is your trusted partner for high-quality motorhome repair service and camper repair. Our certified technicians have the specialized tools, safety equipment, and premium materials needed to inspect, prep, and reseal your RV roof correctly. We identify hidden issues before they turn into costly structural repairs, ensuring your rig stays dry and road-ready for your next adventure. Don't wait for the next heavy rainstorm to test your seals. Contact Mainline RV & Truck Service today to schedule your professional RV roof inspection and resealing service!
July 14, 2026
A functioning slide-out is essential for the comfort and space of your RV. When you press the button and nothing happens, or worse, you hear a grinding noise, it can quickly ruin a camping trip. Understanding how your system works and how to maintain it can save you from being stranded with a rig you cannot drive. At Mainline RV & Truck Service , we see many owners struggle with slide-out failures that could have been prevented with basic upkeep. This guide will help you troubleshoot common issues and understand when it is time to visit a professional motorhome repair shop. Hydraulic vs. Electric Slide Systems: Knowing Your Rig Before you can fix a problem, you must know what type of system moves your slides. Most RVs, fifth wheels, and travel trailers use one of two primary technologies. Electric Slide Systems Electric systems use a 12-volt DC motor. These are common in smaller slides or travel trailers. They typically use a rack-and-pinion gear set, a cable system, or a worm gear (often called a Schwintek slide). Symptoms of Failure: Clicking sounds, uneven movement, or the motor running without the slide moving. Power Needs: These rely heavily on a healthy battery. If your battery voltage is low, the motor will struggle or fail to engage. Hydraulic Slide Systems Hydraulic systems are usually found on larger motorhomes and high-end fifth wheels. They use a pump and hydraulic fluid to push pistons that move the slides. These systems are powerful and can move multiple slides at once. Symptoms of Failure: Fluid leaks under the rig, jerky movements, or a loud whining noise from the pump. Maintenance Needs: You must regularly check fluid levels in the reservoir and inspect hoses for cracks or bulges. Knowing which system you have is the first step in travel trailer repair . If you are unsure, check your owner’s manual or look for a hydraulic fluid reservoir in your exterior compartments. Troubleshooting: Why Your Slide Won’t Move If your slide is stuck, do not keep holding the button. This can burn out the motor or damage the gears. Instead, run through this quick checklist: Check the Parking Brake: Many motorhomes have a safety lockout. The slide will not move unless the parking brake is engaged. Battery Voltage: Ensure you are plugged into shore power or that your house batteries are fully charged. Low voltage is the number one cause of electric slide failure. Look for Obstructions: Inside the RV, check for fallen items behind the trim. Outside, check for tree branches or debris on top of the slide roof. Blown Fuses: Locate your RV’s fuse panel and check for any blown fuses or tripped breakers related to the slide-out motor. Lubricating the Seals to Prevent Leaks and Sticking The rubber seals (wiper seals) around your slide-out serve two purposes. They keep water out and help the slide move smoothly. Over time, these seals can become dry, brittle, or "sticky." When a seal sticks to the side of the RV, the motor has to work much harder to break it loose. This can lead to motor burnout or torn seals. How to Maintain Your Seals: Clean the Seals: Use soap and water to remove dirt, sap, and road grime. Apply Seal Conditioner: Use a dedicated RV slide-out seal lubricant. Avoid petroleum-based products as they can degrade the rubber. Lubricate the Tracks: For electric rack-and-pinion systems, use a dry silicone lubricant on the metal tracks. Dry lube is essential because it does not attract road dust or sand, which can act like sandpaper on your gears. Inspect for Tears: If you see light coming through the corners when the slide is closed, your seals are compromised. This leads to water damage and floor rot. Regular lubrication is a key part of RV repair that owners can do at home to avoid expensive shop visits. Manual Override: How to Get the Slide in for the Drive Home If the motor or pump fails while your slide is extended, you cannot safely drive the vehicle. Every RV slide system has a manual override method. You should learn where yours is before an emergency happens. For Electric Systems Crank Extension: Many systems have a nut on the end of the motor or a dedicated shaft where you can attach a hand crank or a power drill with a socket. Motor Disengagement: Some systems require you to physically unscrew the motor or pop it out of the bracket to manually push the slide in. For Hydraulic Systems Manual Relief Valve: You will usually find a valve on the pump that can be opened with a hex key. Once opened, you may need a team of people to physically push the slide back into the rig. Hand Pumps: Some high-end systems include a manual hand pump integrated into the hydraulic manifold. Safety Warning: Slides are extremely heavy. Never attempt a manual override alone if it requires pushing the unit. Always lock the slide in place with "slide-out bars" or travel locks once it is retracted manually to ensure it doesn't drift out while you are driving. Scheduling Hydraulic Repairs at a Motorhome Repair Shop While basic lubrication and fuse checks are DIY-friendly, hydraulic systems and complex gear alignments require professional expertise. Hydraulic systems operate under immense pressure. A pinhole leak in a hose can be dangerous and cause the slide to drop or extend unexpectedly. Furthermore, if your slide is timing out, meaning one side moves faster than the other, it likely needs a professional synchronization or gear replacement. At Mainline RV & Truck Service, we provide specialized motorhome repair shop services, including: Hydraulic pump replacement and fluid flushes. Hose crimping and leak repair. Slide-out floor repair and structural reinforcement. Electronic control module troubleshooting. Professional intervention ensures that your slide-out remains square within the frame. If the box becomes crooked, it will eventually destroy the motor and the weather stripping, leading to thousands of dollars in water damage repairs. Contact Our Motorhome Repair Shop Today for Travel Trailer Repair Don't let a stuck slide-out ruin your next vacation. Whether you are dealing with a hydraulic leak, a burnt-out electric motor, or worn-out seals, the team at Mainline RV & Truck Service is here to help. We have the tools and experience to handle the heavy-duty requirements of RV and travel trailer repair. Contact Mainline RV & Truck Service today to schedule your maintenance or repair appointment.